.svg)

.svg)
.jpg)
TL;DR
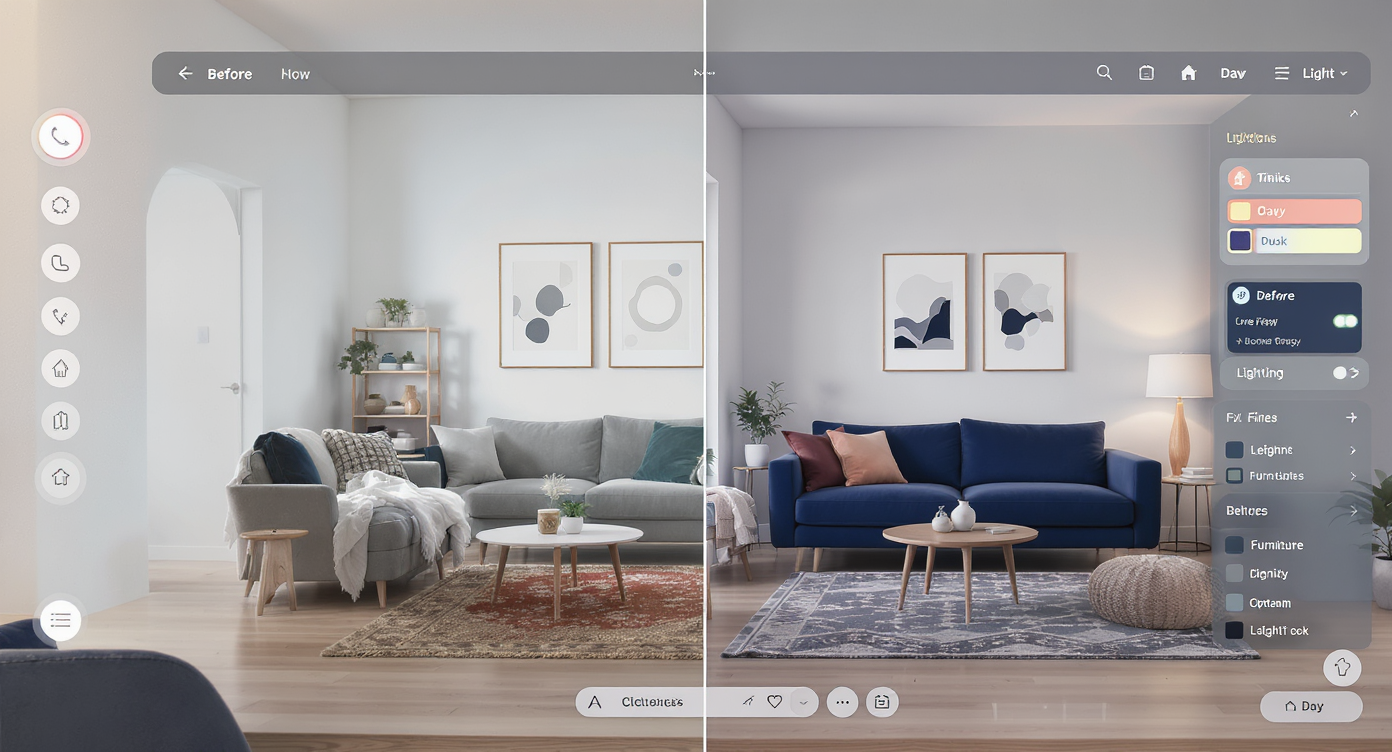
Use AI interior design tools to quickly test layouts, color palettes, lighting, and virtual staging from a photo of your room. Start with a photo-based visualizer like REimagineHome.ai to restyle, declutter, swap furniture finishes, try day-to-dusk lighting, and export before/after images; pair it with a floor-plan tool if you need precise measurements. Treat AI as a mood board, not a blueprint, then validate clearances, scale, and outlets in real life. This is especially useful for small spaces—search “AI interior design tools for small apartments” to find compact-friendly workflows.
Design Your Space with AI: Try Layouts, Colors, and Lighting Before You Commit
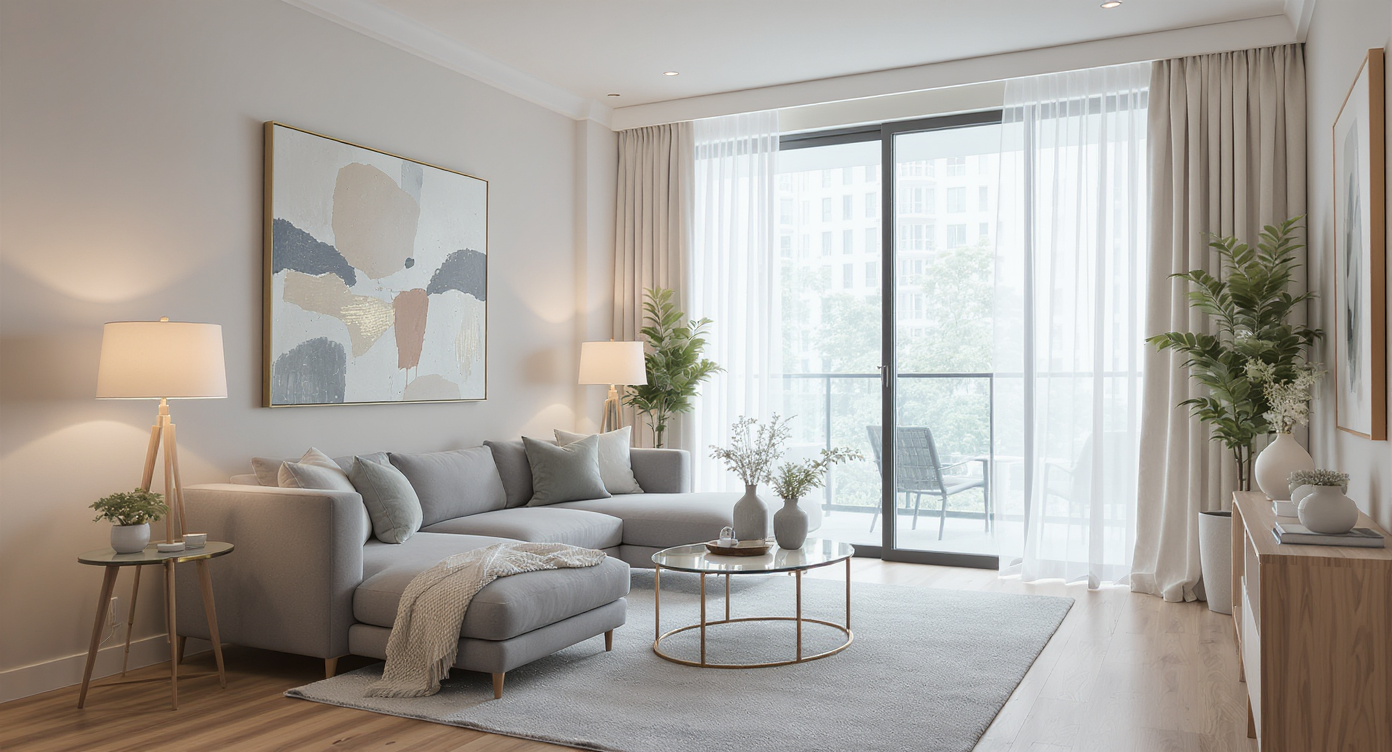
Use AI tools to visualize quick, stunning interior makeovers from your own room photos.
Use AI interior design tools to quickly test layouts, color palettes, lighting, and virtual staging from a photo of your room. Start with a photo-based visualizer like REimagineHome.ai to restyle, declutter, swap furniture finishes, try day-to-dusk lighting, and export before/after images; pair it with a floor-plan tool if you need precise measurements. Treat AI as a mood board, not a blueprint, then validate clearances, scale, and outlets in real life. This is especially useful for small spaces—search “AI interior design tools for small apartments” to find compact-friendly workflows.
What problem are readers trying to solve?
You want fast clarity: which layout works, what paint color will look right in your light, how to stage for buyers, and whether a remodel vision is worth the budget. The stakes are real—mistakes cost time and money, and listings suffer without great visuals. This guide covers the essentials: visualizing furniture layout, picking paint from a photo, small-space optimization, virtual staging from photos, free vs paid options, image-based vs 3D tools, privacy basics, and how to align AI output with contractors or clients.
Anecdote
A homeowner uploaded a cluttered living-room photo and generated three looks: neutral modern, warm eclectic, and coastal light. The neutral concept won on first glance, but the coffee table felt tight; measuring confirmed only 14 inches of clearance. They bumped to an oval table, re-ran a day-to-dusk pass, and exported before/after into a one-page deck. The family agreed in minutes—then ordered with confidence.
The quick, practical path (step-by-step)
Capture a solid room photo. Stand back to include corners and major openings; keep verticals straight by holding your phone level. Turn on a lamp if needed to reduce shadows.
Upload to REimagineHome.ai. Choose a style (e.g., modern, Japandi, coastal) and generate a few alternatives.
Declutter and restyle. Use virtual staging to clear small items, then test focal hierarchy: swap the sofa fabric, try a lighter rug for visual weight, and adjust wall color. Preview day-to-dusk lighting to see evening ambiance.
Refine layout sightlines. Nudge key pieces in the render to improve circulation and reveal the focal point (fireplace, window, TV wall). Aim for 30–36 inches in main walkways and 18 inches between sofa and coffee table.
Dial in color and materials. Compare a neutral palette against a bolder accent wall. Note color temperature: warm (2700–3000K) for cozy living rooms, neutral (3500–4000K) for kitchens/offices.
Test exterior or yard photos if relevant. Apply quick landscaping enhancements or curb-appeal tweaks and a day-to-dusk pass for listing-quality images.
Export clean before/after. Save high-res images for mood boards, listings, or contractor decks. Label files clearly (e.g., “LR_v3_neutral_dusk_before-after”).
Validate dimensions before you buy. If you need measurements or exact placement, bring your visuals into a floor-plan or CAD tool to confirm scale and clearances.
Tool landscape: what to use when
Photo-based visualization & virtual staging: REimagineHome.ai—upload a room photo to restyle, declutter, swap furniture/colors/materials, adjust lighting, enhance landscaping, run day-to-dusk, and export quick before/after.
Floor-plan & layout (2D/3D), measurements, CAD/BIM: use dedicated floor-plan or CAD tools when you need precise dimensions, elevations, or construction documentation.
Mood boards & sourcing: general mood-board apps. Drop exported REimagineHome images alongside swatches, product links, and finish samples to align on direction.
Presentation & sales assets: paste before/after exports into slides, brochures, CMAs, and listing pages to accelerate decisions.
Expert insights & rules of thumb
Plan circulation first. Keep 30–36 inches for primary walkways and 24 inches for secondary paths; 18 inches from sofa to coffee table keeps reach comfortable. Good circulation improves sightlines and reduces visual clutter.
Balance visual weight. If a dark sectional anchors one side, lighten the opposite side with a pale rug or open shelving. Aim for a clear focal hierarchy (e.g., fireplace wall → art → accent chair).
Light in layers. Target 2,000–3,000 lumens total in living rooms, 3,000–4,000 in kitchens. Use 2700–3000K bulbs for cozy spaces, 3500–4000K where task clarity matters.
Right-size rugs. Living rooms typically need at least 8×10 feet; front legs of seating on the rug tie the zone together and stabilize scale.
Mounting sanity checks. Art centers at 57–60 inches off the floor; pendants 30–36 inches above tables; sconce centers ~60–66 inches along halls to maintain even visual rhythm.
For listings, lead with emotion. Use a neutral palette, tidy sightlines, and a day-to-dusk exterior; export clean before/after to show potential and reduce buyer friction.
Visualization Scenario
Upload a photo of your space to REimagineHome.ai, pick a style preset, declutter, swap sofa material and rug tone, try darker accent paint on the TV wall, preview evening lighting with day-to-dusk, and export the final before/after for a listing or contractor brief.
Answers to common questions
What’s the best way to start a room redesign with AI in 2025?
Begin with a strong photo and a photo-based visualizer to explore styles, color, and layout concepts; then validate measurements if you plan purchases. This keeps momentum high without committing to costly moves. Try it in REimagineHome.ai: upload your photo and generate multiple styles to compare focal hierarchy and sightlines.
Can AI pick paint colors from a photo of my room?
Yes—AI can suggest palettes that harmonize with your light and finishes, helping you narrow options. Always test samples on the wall to see color temperature shifts throughout the day. Try it in REimagineHome.ai: upload your photo and preview lighter/darker walls and trim contrasts.
How do I visualize furniture layout without measurements?
Use image-based renders to test the idea and refine circulation paths first; then measure critical dimensions (sofa width, walkway widths) before ordering. AI is a mood board—don’t skip tape-measure reality checks.
What about small apartments or studios—does AI help optimize layout?
AI shines in small spaces by quickly testing zones, storage swaps, and lighter visual weight. Aim for 30–36-inch main paths and keep tall storage along walls to protect sightlines. Try it in REimagineHome.ai: upload a photo and compare “light, airy” vs “cozy, layered” treatments.
Is there an AI tool that virtually stages rooms from photos?
Yes—photo-based virtual staging lets you declutter, restyle, and show alternate looks fast. REimagineHome.ai specializes in this, including day-to-dusk passes and quick before/after exports.
Do I need 3D models or floor plans, or are images enough?
Images are enough for concepting and stakeholder alignment. For precise install heights, cabinetry, or remodel work, pair your exports with a floor-plan or CAD tool; REimagineHome.ai focuses on image-based visualization.
Which AI interior design tools are free vs paid?
Expect a mix: some tools offer free trials/limited exports and paid tiers for higher resolution, more renders, or commercial use. Start with free-to-try, upgrade when you need consistent deliverables.
Are there alternatives to brand-specific AI design apps?
Yes—brand-agnostic visualizers are better for unbiased style exploration and staging. Use REimagineHome.ai for broad looks, then source products that match the winning vibe.
How should I use AI results with a contractor or client?
Lead with a one-page before/after and a bullet list of finishes; keep decisions visible and simple. Exports drop neatly into decks, CMAs, or scopes of work—then confirm measurements before ordering.
What privacy or data steps should I take when using AI design apps?
Remove personal items from photos, avoid sharing addresses, and use project codes for file names. Check each tool’s data policy to see how images are stored or used for training.
Real-world tips (DIY + workflow) and next steps
DIY fixes that mirror the visuals
Paint: eggshell on walls for durability and soft sheen; satin for kitchens/baths.
Rug sizing: choose the largest you can fit; at minimum, front legs of major seating on the rug.
Lighting: swap warm 2700K bulbs for bedrooms/living; neutral 3500–4000K for work zones.
Textiles: layer neutral throws and pillows to calm busy rooms; add one accent color for pop.
Lawn/curb appeal: patch bare spots, edge beds, and add two symmetrical planters to strengthen focal hierarchy.
Workflow tips
File naming: Room_A_V1_style-neutral_daytodusk_before-after.jpg keeps decks tidy.
Sequence images: start with wide-room “before,” then hero “after,” then detail shots.
Approvals: gather comments directly on exported images; lock a final version before purchasing.
Pairing tools: use REimagineHome.ai for fast visuals, then confirm dimensions in a floor-plan tool if you’re ordering large pieces.
CTA: Before you buy, move, or demo, test your ideas in REimagineHome.ai. Upload a photo, restyle in minutes, and export before/after to align your household, clients, or contractor—then make only the purchases that you know will work.


.png)