TL;DR
Building a curved paver walkway comes down to base prep, drainage, pattern discipline, and edge restraint. Use a 4–6 inch compacted base, a 1-inch bedding layer, and avoid the four-corner rule for long-term stability. This guide walks you through how to build a curved paver walkway step by step, with field-tested tips.
Introduction

Understanding the base and drainage layers is key to durable paved walkways.
Most paver walkways last when the base is thicker than you think, the slope is honest, and the pattern avoids four-way joints. I’ve walked enough new installations to know the work looks simple from the sidewalk but lives or dies under the surface.
Hardscaping is having a moment in backyard design because it solves mud, adds curb appeal, and stretches outdoor living seasons. Homeowners want low-maintenance landscaping and a clean path from driveway to door. New installers want a checklist they can trust. This is that list, shaped by what pros recommend and what I’ve seen in real yards—tight curves, French drains, and all.
Here’s the backbone: base, bedding, layout, compaction, restraint, and joints. Get those right and most paver systems, from modular patio pavers to brick walkways, behave beautifully through freeze-thaw and daily foot traffic.
From idea to installation
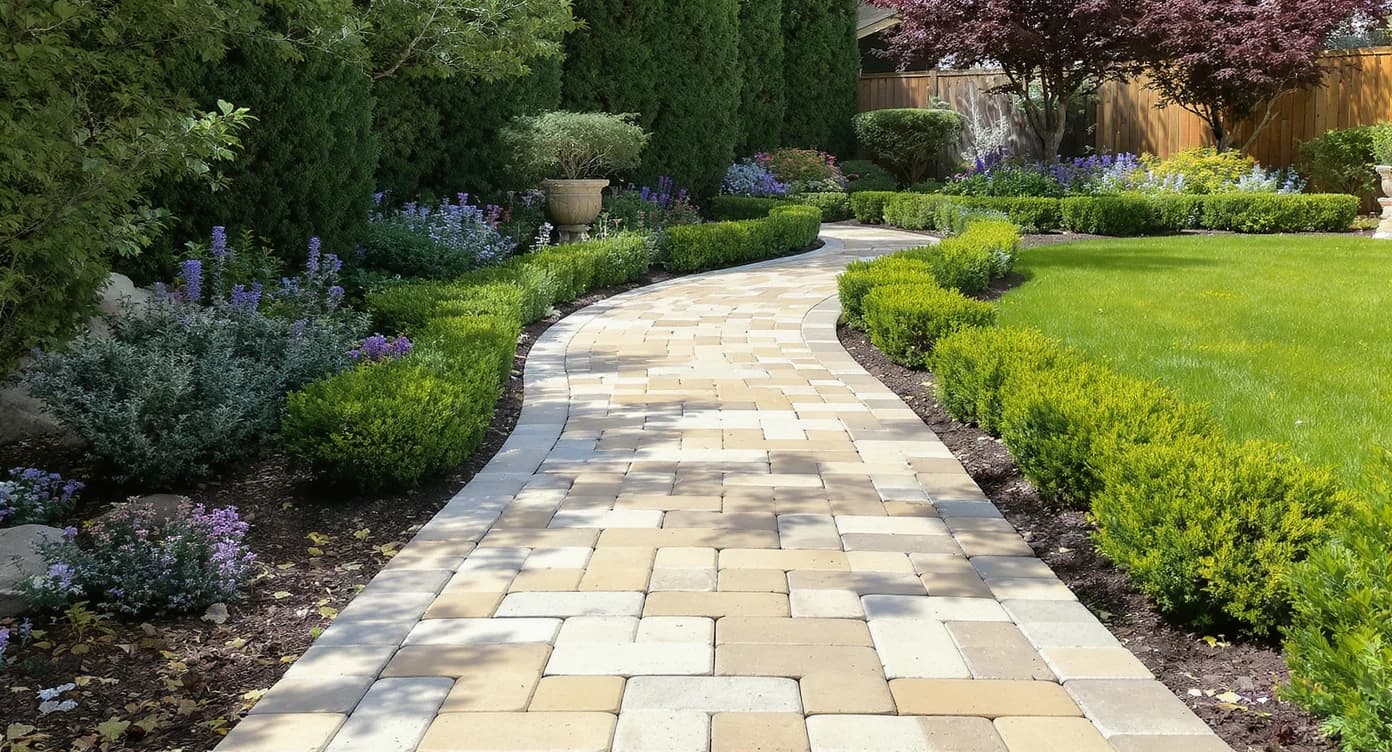
Most curved walkway projects succeed when you map the radius first, then let pattern and cuts respond to that curve. Think of the arc as your backbone and every stone as a rib you set on it.
From plan to plate compactor, this approach links drainage strategy with pattern selection and material choice. Early decisions—like running bond versus modular, or whether you need geotextile over clay—echo all the way to joint sand and edging. Short-tail keywords like hardscaping, paver walkway, and backyard design point people to the project; long-tail queries like how to build a curved paver walkway, how deep should paver base be, and best edge restraint for paver walkway help you finish it with confidence.
Anecdote
On a humid July afternoon, I watched a new installer switch from a “random” modular layout to a simple running bond mid-project. The change erased half a dozen near four-corner joints and tightened the curve; he finished an hour faster with a cleaner line.
10 field-tested hardscaping tips
01. The Right Paver Base Depth
Most foot-traffic walkways need 4–6 inches of compacted, angular base stone plus a 1-inch bedding layer; add 2–4 inches in frost or soft soils.
What it is: A stable foundation of 3/4-inch minus (crushed, not round) gravel that locks together under compaction.
How it works: Compact base in 2–3 inch lifts with a plate compactor to minimize future settling. On clay or organic soils, experts recommend a nonwoven geotextile under the base to separate soil and stone. In colder zones (USDA 4–6) or where soil heaves, deeper base, better drainage, and more compaction passes reduce frost movement. Field note: I’ve seen installers in wet coastal areas go 8 inches of base for curved paths near downspouts, and those curves stay true through winter.
- Excavate 8–10 inches for most walkways; 12 inches if soil is soft.
- Use 3/4-inch minus or similar dense-grade aggregate.
- Compact each lift with 3–4 passes, edges to center.
02. Honest Slope and Drainage
A 2% pitch—about 1/4 inch per foot—away from buildings moves water without feeling sloped underfoot.
What it is: A slight, consistent grade that directs runoff toward lawn, swales, or French drains.
How it works: Set string lines to finished paver height, then measure base depth down from those lines as you build. Where underground drains cross, maintain full base thickness over the pipe to prevent future dips. Horticulturists note that even small low spots collect algae and ice, so stay vigilant at transitions. Field note: In a suburban yard with three downspouts tied to barrels, we kept the walkway grade continuous and used a shallow swale in turf to catch overflow—no puddles, no surprises.
- Plan a 2% fall away from foundations and steps.
- Bridge drain lines with minimum 4 inches of compacted base above the pipe.
- Check slope with a level on a straightedge every 4–6 feet.
03. Screeding the Bedding Layer
The bedding layer should be a uniform 1 inch of concrete sand or screened material—never the place to level big dips.
What it is: The thin cushion that allows precise setting and final vibration lock-up.
How it works: Place two 1-inch screed rails (metal pipe or paver rails), pull a straight board, then remove rails and fill voids. Do not walk on freshly screeded sand; set pavers from the finished area backward. Garden designers often warn that over-thick bedding hides base flaws, which later telegraph as wavy pavers. Keep it true and thin.
- Aim for 1 inch thick after screeding, not 1.5–2 inches.
- Use concrete sand (sharp edges) rather than masonry sand.
- Re-screed small areas you disturb as you cut and fit.
04. Pattern Discipline, No Four Corners
Interlocking pavers are strongest when you avoid a four-way joint—no point where four corners meet.
What it is: The "four-corner rule" means staggering joints so there is always a running bond or interlock, not a crosshair.
How it works: Use running bond, herringbone, or the manufacturer’s modular patterns to break joints. In modular sets, follow the supplied layout sequence; it looks random but repeats to maintain interlock. Experts recommend shifting any potential four-way by trimming one paver or sliding a joint. Field note: On a tight curve, I like a soldier course border, then a running bond inside—clean, strong, and easy to read from the street.
- Start with a running bond if you’re new to patterns.
- Check every few courses for accidental four-corner joints.
- Keep joint spacing consistent, generally under 3/8 inch.
05. Cutting for Curves
Curved walkways look crisp when inside joints close to 1/8–1/4 inch, achieved by fan cuts or radius-specific units.
What it is: Fitting pavers along a radius with either wedge-shaped units or cut rectangles.
How it works: For tight arcs, mark the curve with a flexible edging or hose, dry-lay, then cut with a wet saw and diamond blade. Beveling the cut edge slightly removes micro-chips and helps polymeric sand lock. In sandy or loam soils, a soldier course on edge restrains the curve visually and structurally.
- Dry-lay, chalk the curve, then cut in batches.
- Use ear/eye protection and a wet table saw for accuracy.
- Backfill cuts with polymeric sand after compaction.
06. Edge Restraint That Stays Put
Edge restraints prevent drift; spikes set every 8–12 inches keep borders tight through freeze-thaw.
What it is: Plastic, aluminum, concrete, or paver-on-edge systems that hold the field in place.
How it works: Set edging on compacted base, not on topsoil, so spikes bite into dense aggregate. In curved paver walkways, flexible edge restraints follow the radius without kinking. Where a brick or stone soldier course is used, bed it on base and spike a hidden restraint outside the course.
- Install edging after initial compaction, before final sand pass.
- Spike every 8–12 inches; closer on tight curves.
- Backfill and sod or mulch immediately to protect edges.
07. Compaction, Twice
Compact the base in lifts, then compact the laid pavers again to seat them into the bedding layer.
What it is: Two stages of vibration: one for foundation strength, one to settle pavers and joint sand.
How it works: After laying, run a plate compactor with a protective mat over the surface in overlapping passes. This vibrates bedding sand upward and seats the pavers evenly. Professionals aim for 2–3 passes at 90 degrees to each other. Field note: On large-format patio pavers, a rubber pad or high-frequency compactor prevents scuffing.
- Make 3–4 passes on base, 2–3 passes on the laid field.
- Add a poly pad to avoid marring faces.
- Re-check edges after compaction; reset if needed.
08. Polymeric Sand Done Right
Polymeric sand needs dry joints, full depth, and light, even wetting to cure without haze.
What it is: Sand with binders that harden when moistened, locking joints and discouraging weeds.
How it works: Sweep sand, compact to settle it deep, top off, then blow dust from faces. Mist with a fine shower, never a jet, until joints are uniformly damp. Avoid rain for 12–24 hours, per product label. In narrow curve joints, tamping first helps the sand find depth.
- Apply on a dry day above 50°F if possible.
- Compact, refill, then wet lightly in 2–3 passes.
- Blow off dust to prevent polymer haze.
09. Respect Utilities and French Drains
Keep a minimum 6–12 inches of compacted base between the walkway edge and any French drain trench.
What it is: Separation between structural base and softer trench backfill.
How it works: Drains settle differently than compacted base. By extending excavation and base beyond the pavers—often 12 inches each side—you create an “apron” that resists raveling. Where drains limit width, use denser base and a sturdier edge restraint to compensate.
- Flag drain lines before excavation; hand-dig within 18 inches.
- Extend base 12 inches beyond pavers where space allows.
- Choose aluminum edge restraint near drainage for rigidity.
10. Finishing Touches for Curb Appeal
Consistent joint width, a defined border, and a planting pocket turn a path into real backyard design.
What it is: The small decisions—border color, mulch line, accent plant—that make the walkway read clean from the street.
How it works: A contrasting soldier course outlines the curve and hides small cut variations. Where grass struggles inside tight arcs, replace lawn with a small planting—lavender in full sun, or a low evergreen in shade—for low-maintenance landscaping that stays green. I’ve seen gardeners replace a problem sliver of turf with a gravel pocket and one bold pot; it looks intentional and stays tidy.
- Add a contrasting border to frame the field.
- Swap tiny grass triangles for drought-tolerant perennials.
- Mulch cleanly to the edge, 2–3 inches deep.
A brief reflection
The strongest hardscapes are quiet. They shed water, ignore winter, and invite you down the path without a word. The beauty of modern hardscaping isn’t perfection, it’s intention—each pass with the compactor, each avoided four-corner joint, a small vote for durability.
Visualize before you dig
Before you plant a single shrub or cut a single paver, preview the layout at scale and in sunlight. Platforms like ReimagineHome let you test radius sizes, border options, and paver patterns on a photo of your actual yard, turning ideas into a living blueprint you can trust.
Visualization Scenario
A 36-inch curved path from driveway to porch, bordered in charcoal soldier course, with a lavender-and-sedum pocket tucked where grass never grew, previewed and tweaked in ReimagineHome before any soil was moved.
FAQ
How deep should the base be for a paver walkway?
For foot traffic, most installers use 4–6 inches of compacted base plus a 1-inch bedding layer; add depth in frost or soft soils. This hardscaping standard balances stability and drainage.
What is the four-corner rule in pavers?
The four-corner rule means avoiding a joint where four paver corners meet, which weakens interlock. Running bond, herringbone, or modular patterns prevent four-way joints.
How much slope does a walkway need for drainage?
A 2% grade—about 1/4 inch per foot—moves water away from buildings without feeling steep. Consistent slope prevents puddles and ice.
When should polymeric sand be applied?
Apply polymeric sand when the surface and joints are dry, after compacting the field. Sweep, compact to settle sand, top off, blow dust, then mist lightly.
What edge restraint is best for a curved paver walkway?
Flexible plastic or aluminum edging spiked every 8–12 inches works well on curves, installed on compacted base. A soldier course border can add strength and a finished look.
Can a walkway cross over French drains?
Yes, but maintain full base thickness over the pipe and keep 6–12 inches of compacted base between the walkway and the trench. This reduces differential settling and cracks.
Closing reflection
Most homeowners remember the first dry day they could walk a new path in their socks. A good walkway does that—it softens daily life. If you keep to the fundamentals—sound base, honest slope, smart pattern, real restraint—the rest is style, and style is the fun part. Whether you’re a first-time installer or a weekend builder, set your line, listen to the stone, and let the curve lead you home.