
TL;DR
AI surface restyling lets you recolor and retexture floors and walls from a single photo so you can compare hardwood vs tile vibes, try new wall paint, and test styling without demolition. It’s the fastest way to answer, “Do I need new floors—or just new color?” Try it on your own room with ReimagineHome.ai and the Surface Restyling solution. If you’re weighing value and realism, this is the low-risk way to see results before you spend.
Why Photos Still Make or Break Your Decision in Seconds
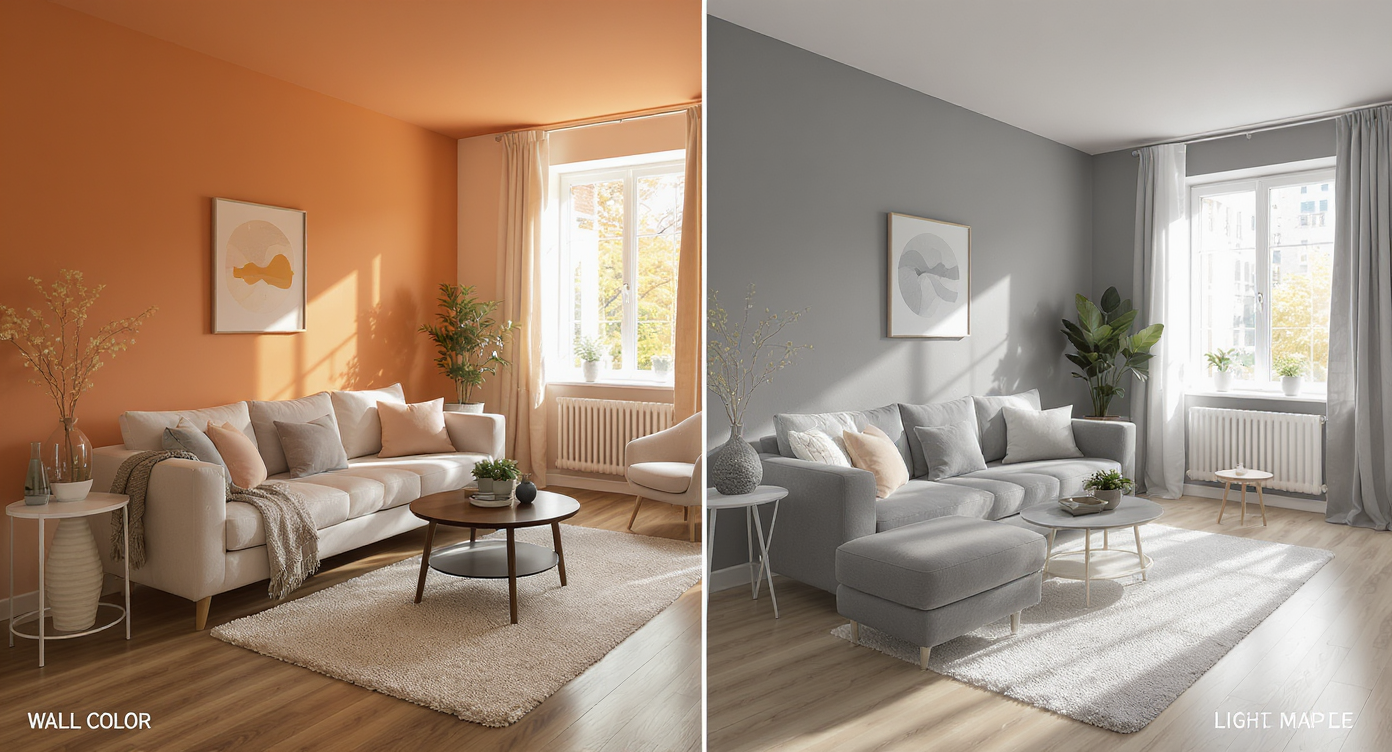
Easily preview multiple paint and floor colors side-by-side with AI surface restyling.
AI surface restyling is a fast way to digitally change floors, wall colors, cabinets, or tile from a single photo; it helps you compare options like tile vs hardwood or gray vs green paint without lifting a plank. For most homeowners, it’s the simplest path to see if the room needs new material—or just new color and contrast.
- Results: See multiple floor and wall colorways in minutes, side by side, no demolition.
- Realism: Photoreal textures and lighting that respect perspective and room geometry.
- Speed: Upload, select surfaces, choose styles, render; test 5–10 looks in one sitting.
- Cost: Spend a fraction of what a flooring change or repaint would cost to preview.
- Workflow: Use your own photo; share versions with a partner, contractor, or agent.
- ROI: Avoid expensive regrets; upgrade only what truly moves the needle.
Instead of guessing how your space might feel, upload a photo to ReimagineHome.ai and try the Surface Restyling tool on a real room.
Why This Problem Matters More Than It Seems
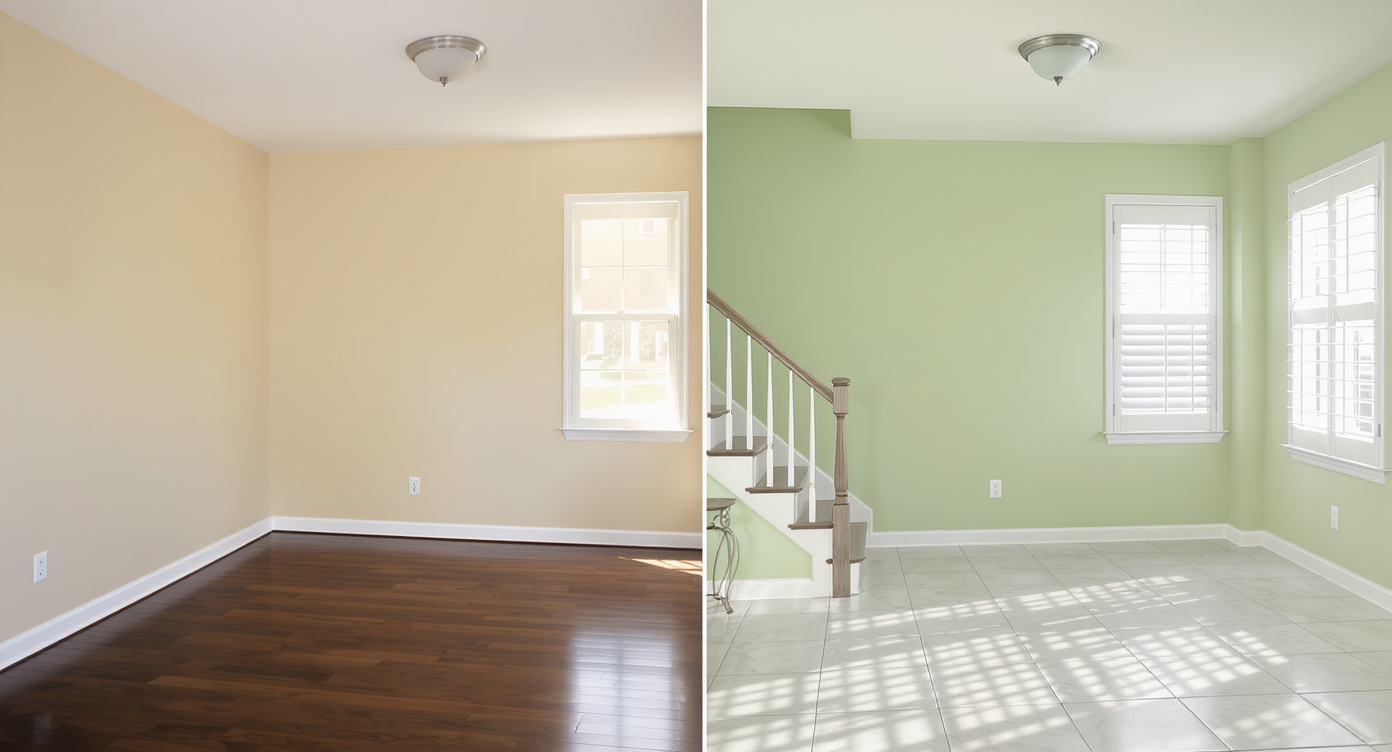
Wall and floor colors drastically affect room warmth and mood, visually showcased here.
Rule of thumb: most rooms feel warmer or cooler first from wall color and decor contrast—long before you change the floor material. That’s why so many people are shocked to learn that swapping gray paint for a deep green and refreshing rugs can make hardwood look “new” again.
Visually, hardwood vs tile is a style decision; physically, it’s a comfort and maintenance decision. Tile is colder, louder, and unforgiving underfoot; grout lines collect debris and amplify how often you notice dust. Wood is warmer, quieter, and easier to refinish if tastes change. But the desire for a new look is real. The smart move is to test what you’re actually craving—warmer color, higher contrast, a cleaner canvas—before you sign up for demolition.
That listing with great bones but gray-on-gray walls? Repainted digitally, it suddenly reads curated and cozy. The dining room that “needs tile”? Often it needed a lighter rug and a less cool wall color. Surface restyling makes those low-lift fixes obvious in one sitting.
Anecdote
That dining space with beautiful hardwood and gray walls? The owner swore it “needed tile” until a Surface Restyling pass with green paint and a lighter rug made the floors look brand new—no demo, no grout, no regrets.
What ReimagineHome.ai’s Surface Restyling Actually Does

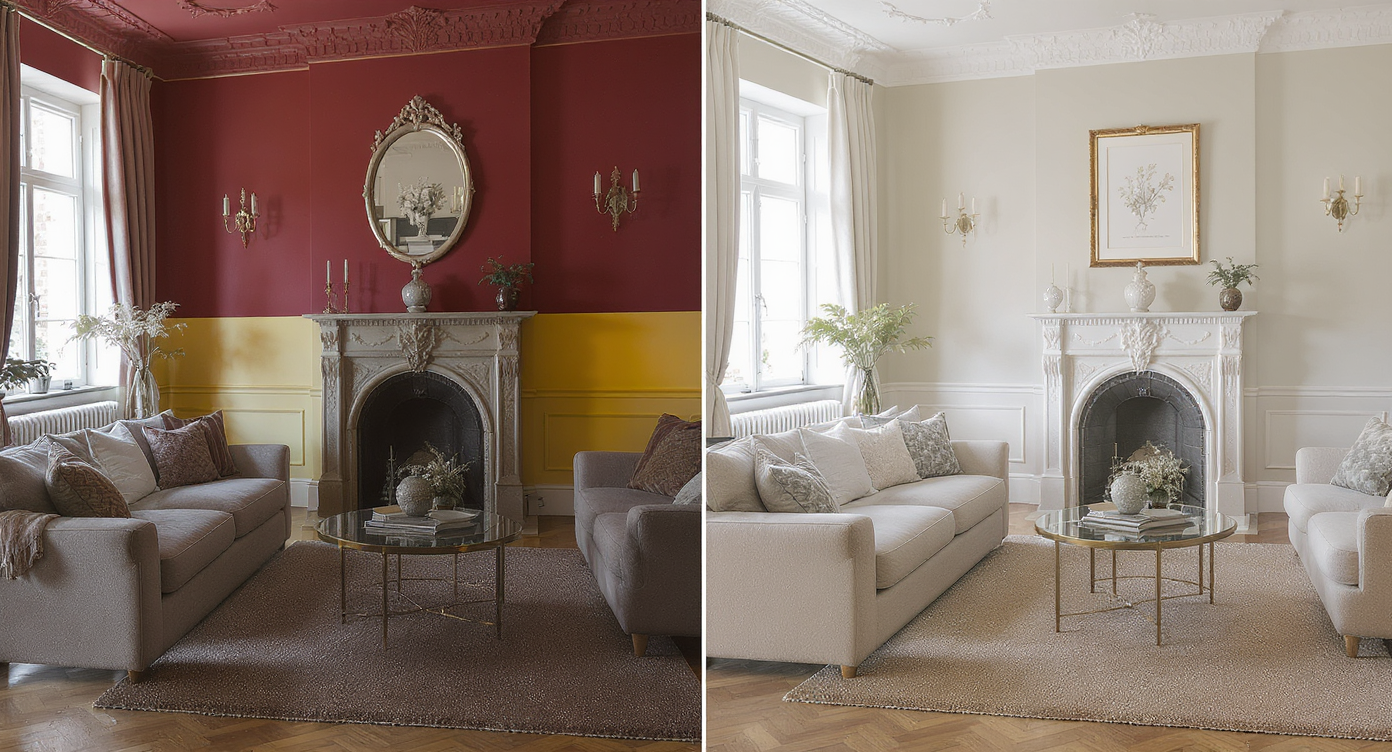
ReimagineHome.ai lets you recolor and retexture surfaces to preview remodels confidently.
Definition: Surface Restyling in ReimagineHome.ai lets you recolor or retexture floors, walls, cabinets, and tile in a photo so you can evaluate hardwood tones, checkerboard looks, terracotta, or paint color changes quickly and realistically.
It solves a costly uncertainty problem—what if the floor isn’t the issue? You provide: one clear photo of your space. It outputs: photoreal variations with new floor materials or tones, new wall paint, even cabinet finishes, aligned to your room’s perspective and lighting.
ReimagineHome.ai Surface Restyling can simulate timeless hardwood stains, stone or ceramic tile textures, and modern paint palettes. If walls are your main question, you can switch to the ReimagineHome.ai repaint wall tool to fine-tune color accuracy on trims, ceilings, and accent walls. And if furniture feels off, layer in Swap Furniture & Objects to preview tables, chairs, and art that better suit the new palette.
How to Use Surface Restyling Step by Step
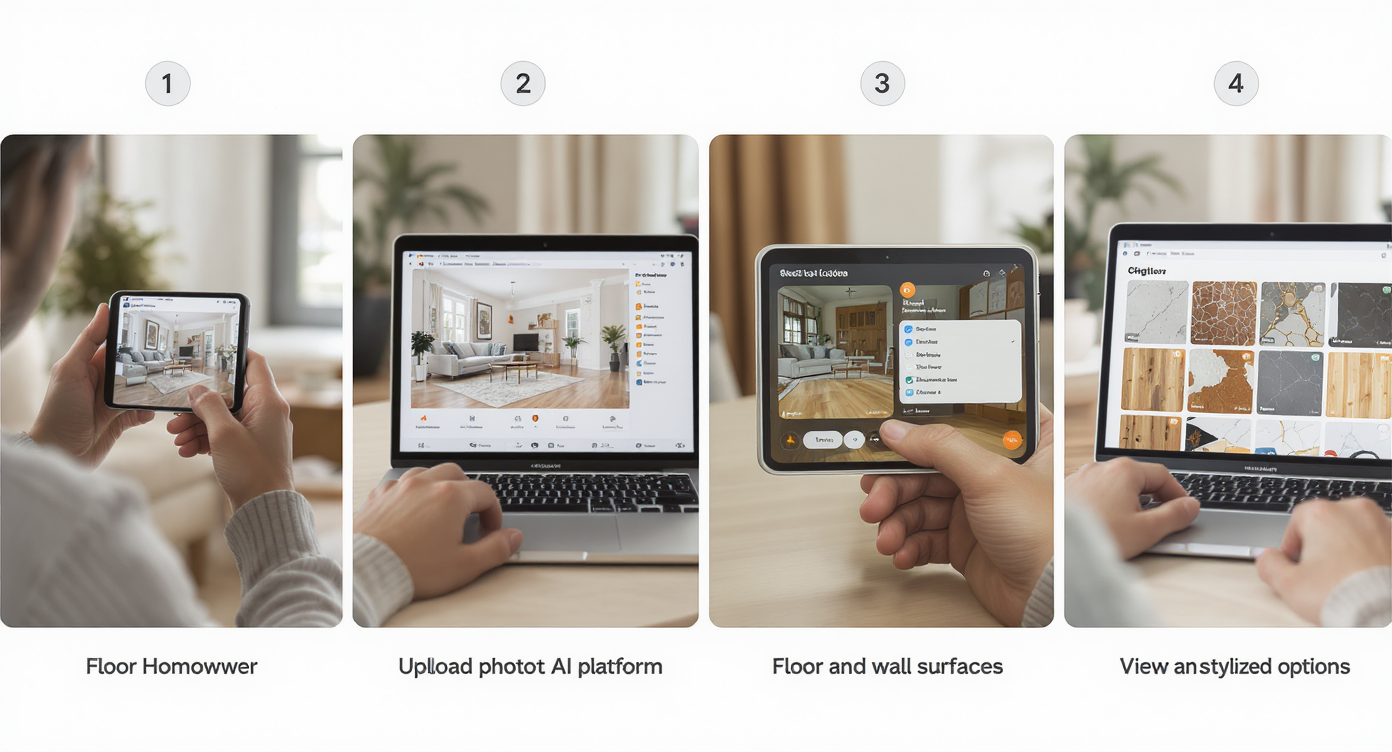
Follow these simple steps to digitally restyle your home's surfaces with ease and speed.
Guideline: start with a well-lit, straight-on photo at 2000–3000 px on the long edge; avoid heavy glare or motion blur for the most accurate edges.
- Upload your room photo. Choose Surface Restyling from the tool menu.
- Select surfaces. Brush over floors, walls, cabinets, or tile; the tool respects edges and baseboards.
- Pick a direction. Try “terracotta tile,” “light oak,” “warm walnut,” or “black-and-white checker” for floors; test “muted olive green,” “cream white,” or “warm greige” for walls.
- Render multiple looks. Save 3–6 options with different floor/wall combos so you can compare vibe vs comfort trade-offs.
- Reality check. Ask: Does the room feel bigger? Warmer? Calmer? If the floor change only looks good with a different wall color, try the wall first.
- Refine details. If furniture feels too heavy for the lighter palette, quickly test a different table or rug using Swap Furniture & Objects.
- Decide and act. If the hardwood wins with a new paint color, plan the paint day. If tile still sings, you’ve validated it with eyes open to maintenance and comfort.
Pro tip: keep one option that changes only the walls and textiles. It’s surprising how often that version “wins” once you see it next to floor overhauls.
Common Mistakes When Using AI for Surface Changes (and Easy Fixes)
Avoid over-editing surfaces; subtle, architecture-respecting changes yield best results.
Insight: over-editing surfaces far from what the architecture supports is the fastest way to create a mismatch you’ll tire of.
- Pushing styles that fight the house. A checkerboard floor can be chic—but not always across a large, traditional living-dining space. Fix: test it in smaller zones digitally first.
- Ignoring grout reality. Highly textured or brick-look tile means deep grout lines that trap dust and catch chair legs. Fix: simulate smoother tile, larger formats, or keep wood in dining areas.
- Uploading low-quality photos. Blurry, angled shots confuse edges. Fix: shoot at eye level with even daylight; aim for 2000–3000 px.
- Color drift from cool lighting. Cool bulbs can make “warm white” look gray. Fix: try a daylight photo and preview neutrals with Repaint Wall for tone checks.
- Forgetting scale. Small-format tiles in large rooms can look busy. Fix: render both large and small formats to see pattern density before deciding.
Visualization Scenario
Upload a photo of your living-dining room. In one render, test warm walnut floors with cream walls; in a second, keep your current hardwood and paint the walls deep olive; in a third, try checkerboard floors with white walls. Compare them side by side and notice which one makes you breathe easier.
FAQ
How realistic is AI for restyling floors and walls?
Very realistic for planning: textures align to perspective, and paint reads convincingly under typical lighting. Use Surface Restyling to compare materials, then confirm exact paint chips in person.
Can I test black-and-white checkerboard floors or terracotta with AI?
Yes. You can preview checkerboard, terracotta, stone, or different hardwood stains from a single photo using ReimagineHome.ai Surface Restyling, and see how each interacts with your existing walls and furniture.
What if the room only looks good after changing wall color?
Change the walls first. Many rooms transform with paint alone. Use Repaint Wall to try creams, greens, or warmer neutrals digitally before buying paint.
Will AI edits mislead buyers or guests?
Use AI images as planning visuals. If you share them for real estate, label them as “virtually restyled” and include the original for transparency.
What image quality do I need for good results?
A clear, evenly lit photo at 2000–3000 px on the long edge works best. Eye-level angles make edges and textures render more accurately in Surface Restyling.
Real Before-and-After Stories Using Surface Restyling
Benchmark: seeing three options side by side reduces second-guessing dramatically—because you’re comparing, not imagining.
- The hardwood “keep it” moment. A homeowner ready to replace oak with checkerboard tested three AI versions: tile + gray walls, hardwood + deep green, and hardwood + cream. The winner? Hardwood with green walls—saved thousands and the room felt instantly warmer.
- The agent’s pre-list refresh. An agent used Surface Restyling plus Repaint Wall to show sellers a lighter wall and rug concept while keeping original floors. The staged photos (virtual + real paint) drew more showings without touching the flooring.
- The investor sanity check. A flipper debated terracotta tile in a craftsman dining room. AI restyling confirmed it clashed; a mid-tone walnut stain with creamy walls aligned with the architecture and sold fast.
Power Pairings: Other ReimagineHome Tools That Amplify Surface Restyling
Claim: the strongest room visuals often come from two or more targeted edits working together.
- Surface Restyling + Repaint Wall: Lock the floor look, then audition precise wall and trim colors. Great for homeowners avoiding repainting twice.
- Surface Restyling + Swap Furniture & Objects: If the palette works but the table or rug doesn’t, swap them digitally and choose pieces with confidence.
- Surface Restyling + Virtual Staging: For vacant spaces, add furniture styles that match the new floor/wall concept to understand the full effect pre-renovation.
Visualize Your Next Room Before You Commit
Claim: the best design decisions come after you’ve seen at least three credible visual options. With Surface Restyling, you can weigh warmth, pattern, and maintenance in a single afternoon—without touching your floors.
Picture the moment you realize it was the paint and the rug all along—and your hardwood suddenly looks like the hero again. Or, if tile still feels right for your climate and lifestyle, you’ll pursue it knowing it genuinely elevates the space, not just your impulse for change.
When you can see the upgrade before you pay for it, every decision feels calmer. Start with one honest photo in ReimagineHome.ai, pick the Surface Restyling tool, and watch the next version of your home come into focus.