
TL;DR
Surface restyling is a fast way to digitally repaint and retexture cabinets, ceilings, walls, floors, and tile from a photo so you can preview kitchen remodel finishes before committing. If you’re asking how to digitally repaint cabinets or test backsplash options with AI, upload a photo to ReimagineHome.ai and try surface restyling on your real space. You’ll make quicker, more confident choices, avoid costly do-overs, and keep the project moving.
The Real Cost of Guessing on Finishes
Surface restyling lets you preview real finish choices on your actual kitchen photo digitally.
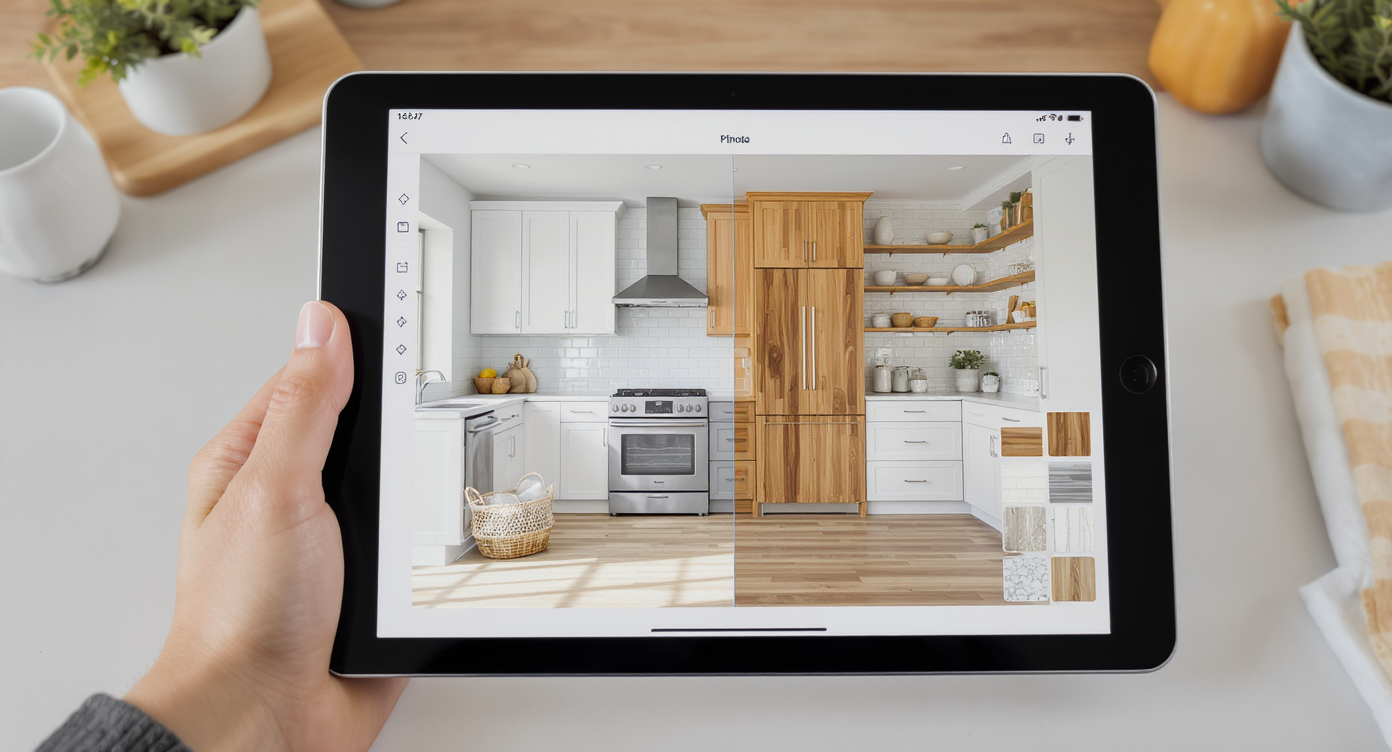
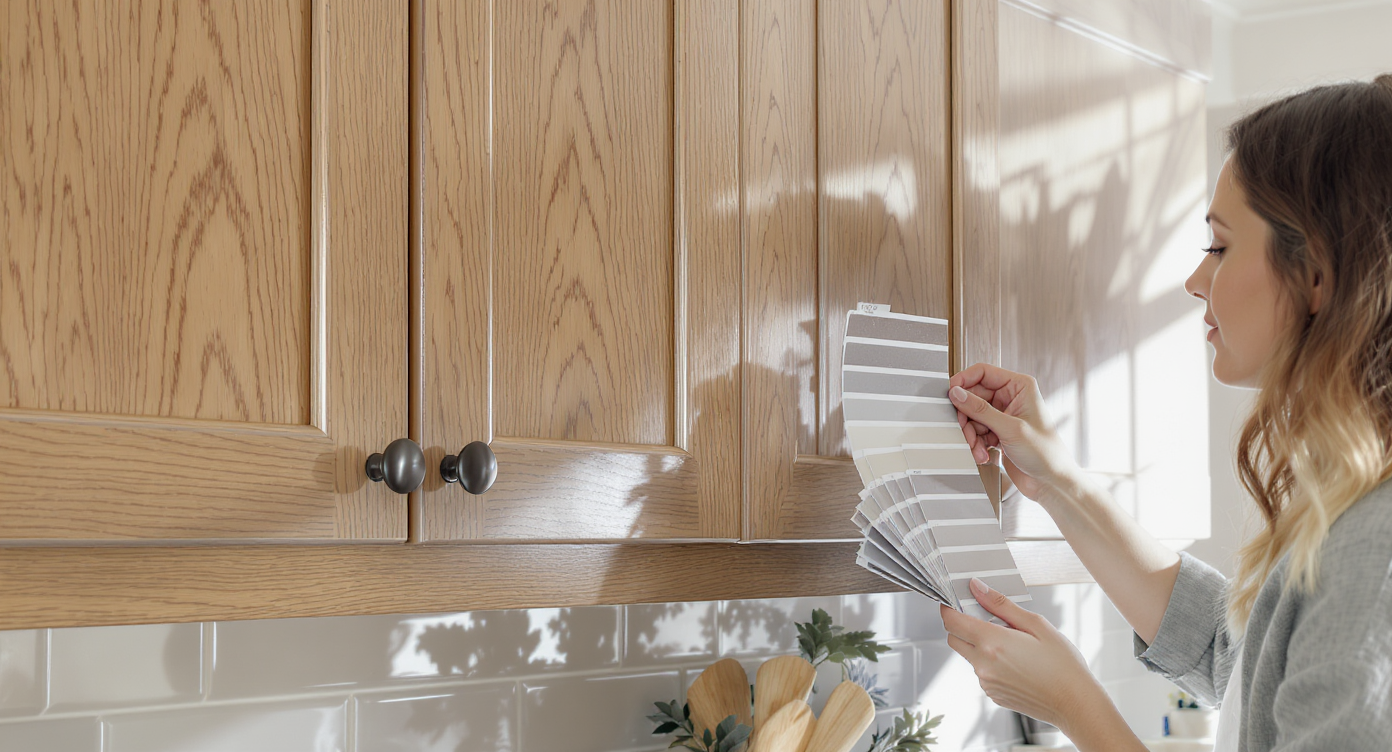
Surface restyling is the process of digitally recoloring or retexturing cabinets, ceilings, walls, floors, and tile using a single photo of your kitchen. It’s powerful because you can compare white vs. wood ceilings, cabinet paint options, backsplash patterns, and flooring tones side by side—without buying samples or living with an expensive mistake.
- Results: See multiple finish schemes for cabinets, ceiling, backsplash, and floors on your actual kitchen.
- Realism: Photorealistic textures respect lighting, reflections, grout lines, and wood grain.
- Speed: Generate alternatives in minutes, not weeks of sampling.
- Cost: Avoid repainting, reordering tile, or change orders after install.
- Workflow: Upload a photo, select surfaces, pick finishes, generate, and compare.
- ROI: Faster decisions, fewer delays, and fewer “wish we hadn’t” moments.
- Peace of mind: Aligns opinions before a single brush stroke or tile cut.
If you already have a tricky kitchen photo in mind, upload it to ReimagineHome.ai and test surface restyling on a real image while you read.
Why This Visual Problem Hurts More Than You Think
Previewing finishes prevents costly mistakes and frustrating remodel surprises.
Previewing paint, tile, and cabinet finishes visually can prevent costly repainting and change orders later. What looks “fine” on a swatch often shifts dramatically once it meets your room’s daylight, ceiling height, undertones, and big fixed elements like floors and appliances.
Here’s how it shows up:
- Scroll behavior: In real estate photos and project shares, a single off-note (like ill-fitting curtains or a harsh ceiling color) dominates attention and comments.
- Perception: White ceilings can brighten and lift; natural wood can warm and ground. Without a preview, teams argue in the abstract instead of choosing what works best for your light and layout.
- Confidence: Decision fatigue stalls projects. A quick A/B on your exact kitchen—cabinet white vs. greige, blue tile vs. neutral, woven shades vs. panels—settles debates fast.
Surface restyling lets you evaluate the whole composition (ceilings, cabinets, tile, floors, lighting and window treatment tones) as one visual story, so no single element hijacks the room.
Anecdote
That perfect kitchen that felt “off” because the curtains stole the show? A quick mockup with woven shades put the focus back on the tile—and ended the debate in minutes.
What Surface Restyling Actually Is (In Plain Language)
AI-driven edits recolor and retexture surfaces realistically in your kitchen photo.
Surface restyling is an AI-driven edit that repaints or retextures visible surfaces—think ceiling boards, cabinet doors, islands, backsplash tile, and flooring—in a photograph while preserving lighting, shadows, and material realism.
You provide a photo of your space. The tool identifies the surfaces you want changed and renders finish options that look convincingly real. The output is a set of high-quality images you can compare, save, and share.
To try it, open ReimagineHome.ai’s surface restyling tool. It’s designed for kitchens, baths, and any room where color and material choices drive the outcome.
How Surface Restyling Works Step by Step
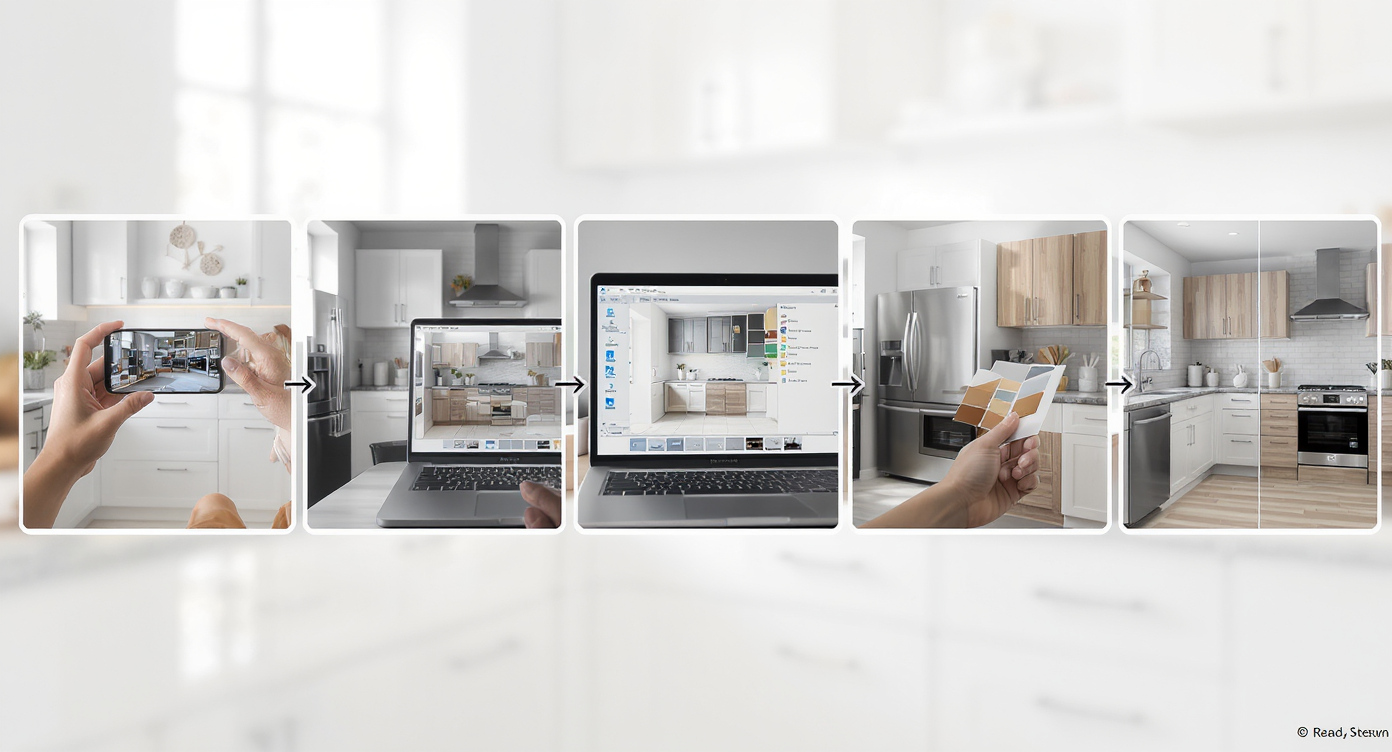
Follow these steps for realistic surface restyling that guides your decisions.
- Choose the right photo: Shoot during daytime with even light. Ensure the ceiling, cabinets, backsplash, and floors are visible. Aim for at least 2000–3000 pixels on the long edge.
- Upload to ReimagineHome.ai: Start a new project and select surface restyling.
- Select surfaces: Highlight ceilings, cabinets, islands, walls, backsplash, or flooring. Keep selections clean around edges and hardware.
- Pick finishes: Test whites and stains for ceilings, paint colors for cabinets, tile patterns for backsplash, and warmer/cooler flooring tones.
- Generate and compare: Produce multiple variations (e.g., white ceiling + blue tile vs. wood ceiling + neutral tile) and review them side by side.
- Refine: Adjust undertones, lighten/darken, or switch patterns if a choice feels too stark or too flat.
- Export: Download high-quality images for your contractor, designer, or decision meeting; keep originals for reference.
Constraint to note: If your source photo is very dark, blown-out, or taken at an extreme angle, results may look less consistent. A quick re-shoot with balanced lighting usually fixes it.
Tips and Tricks for More Realistic Results
Realistic textures and lighting keep your digital restyling believable and precise.
Aim to change finishes, not physics—keep lighting and architecture believable.
- Match undertones: If your floors are warm, test warm whites or light greiges for cabinets and ceilings before jumping to a cool white.
- Ceiling choices: Try pure white, soft white, and a whitewash pass. A subtle whitewash can preserve wood character while lifting brightness.
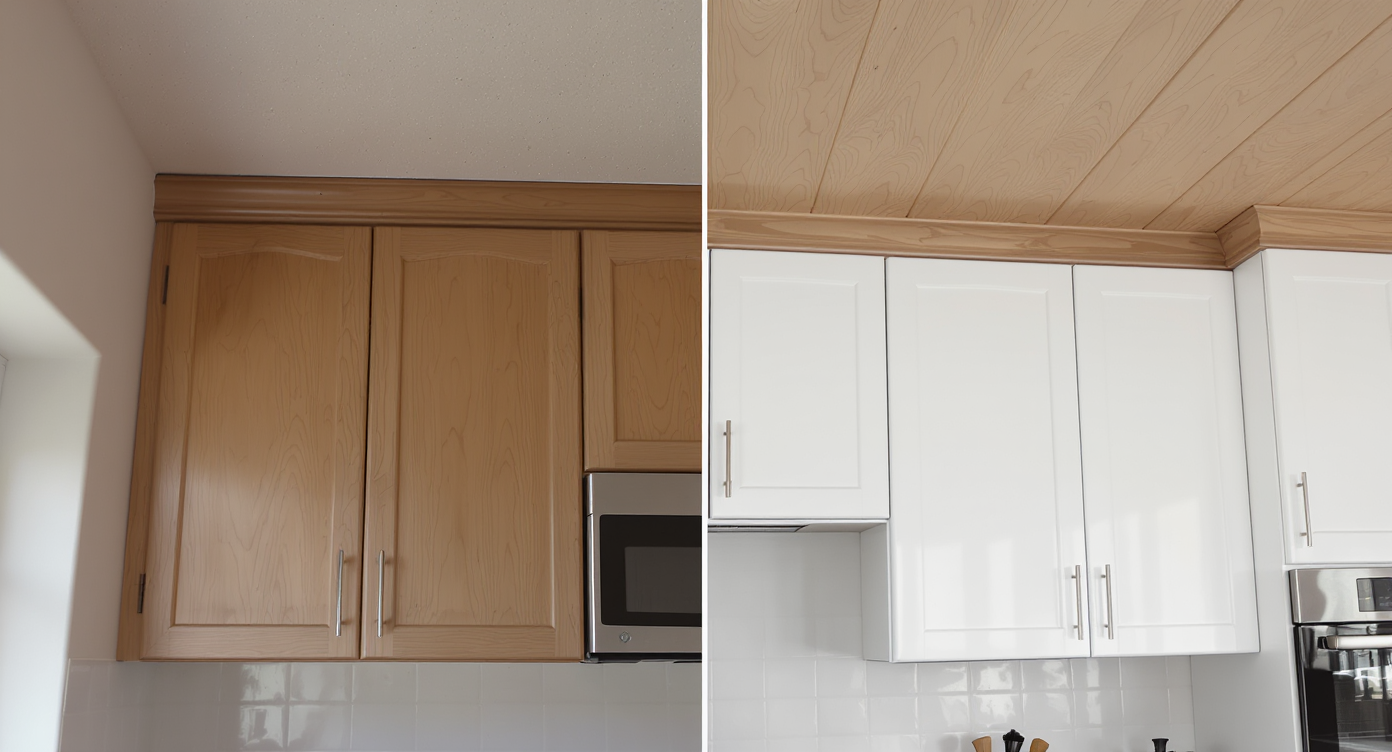
- Cabinet realism: Preview sheen (matte vs. satin) and consider two-tone schemes—light uppers with a soft-color island—before committing.
- Backsplash balance: Large-scale or high-contrast tile needs breathing room. Compare with simpler counters, or keep counters quiet if the tile is bold.
- Floor cohesion: Nudge floor tone warmer/cooler to see which direction unifies the room with appliances and hardware.
- A/B window treatments: If fabric panels feel heavy near a working range, mock up woven shades or roller blinds. You can pair surface restyling with Swap Furniture & Objects to visualize lighter window treatments or different light fixtures.
- Paint tests beyond walls: For ceilings and accent walls, quick trials via ReimagineHome.ai’s digital repainting can pinpoint the exact white or color family before you order gallons.
Visualization Scenario
Upload a straight-on shot of your kitchen, mask cabinets, ceiling, backsplash, and floor, then try a whitewashed ceiling, softer cabinet white, calmer tile, and warmer floor to find the composition that finally clicks.
FAQ
What is surface restyling in a kitchen remodel?
It’s a digital way to repaint or retexture visible surfaces—cabinets, ceilings, walls, floors, backsplash—on a photo of your space. Try it on your room with ReimagineHome.ai’s surface restyling tool.
Can AI really repaint cabinets and ceilings realistically?
Yes. The tool preserves lighting, shadows, and texture, so painted wood still reads as wood, and grout lines remain intact. Results are photorealistic enough for confident decisions.
How do I preview backsplash patterns and tile colors digitally?
Upload a straight-on kitchen photo, select the backsplash area, and test patterns and colors at true-to-life scale. Generate multiple options to compare side by side.
What photo resolution works best?
Use clear, well-lit photos at 2000–3000+ pixels on the long edge. Avoid blown highlights or heavy noise for the most accurate renders.
Can I test window treatments or lighting too?
Yes. Combine surface restyling with Swap Furniture & Objects to try different fixtures or window treatments on your photo.
Metadata Block
Opening line: Preview kitchen finishes with AI surface restyling to choose the right cabinets, ceiling, tile, and floors before you remodel.
Tags: Interior design, Home Remodeling, Home Improvement, Kitchen, Kitchen Cabinets, Backsplash, Flooring, AI in real estate, Home Staging, Virtual Staging, Real Estate Agents
Alt-text suggestions:
Alt: “Kitchen photo showing AI surface restyling: wood ceiling previewed as soft white, with blue tile backsplash, via ReimagineHome.ai.”
Caption: “Test white vs. wood ceilings and backsplash colors on your real kitchen photo before you commit.”
Alt: “Cabinet color A/B comparison using ReimagineHome.ai surface restyling.”
Caption: “Two-tone cabinets, alternate whites, and sheen changes—decide faster with a photoreal preview.”
Where Surface Restyling Totally Changes the Game
Even simple visual rehearsals can shift the whole project trajectory.
- The ceiling debate: A homeowner torn between knotty-pine warmth and a bright, white ceiling previewed three options—natural, whitewash, and soft white. The whitewash won, keeping texture while dramatically increasing light bounce.
- Curtain vs. shade dilemma: Heavy blue panels kept stealing the show. Mockups of woven shades and neutral Roman blinds instantly calmed the composition and let the backsplash shine.
- Tile commitment fears: A patterned blue backsplash looked risky on a shelf. On the real photo, paired with a quiet counter and warm floor, it felt balanced—and became the project’s signature.
Common Mistakes with Surface Restyling (and Easy Fixes)
Most disappointment comes from weak source photos, not the AI itself.
- Using tiny or blurry images: Shoot at high resolution with steady hands; avoid extreme wide-angle distortion.
- Pushing edits too far: If wood grain vanishes or grout looks painted on, dial back to a credible finish or try a whitewash instead of pure paint.
- Ignoring undertones: A cool white next to a warm floor can read “off.” Test warmer whites or adjust floor warmth to meet in the middle.
- Mismatched scale: When testing tile, keep pattern scale realistic to your actual tile size and layout.
- Forgetting coordination: If you change cabinets to crisp white, ensure hardware, faucets, and lighting finish still work—or preview alternatives with Swap Furniture & Objects.
Who Gets the Most Value from This Tool
Anyone facing high-stakes finish choices benefits from seeing options on their real room.
- Homeowners and renovators: Reduce second-guessing and keep timelines intact by deciding on colors and materials up front.
- Designers and stagers: Present polished A/B boards on the client’s actual kitchen, accelerating approvals.
- Contractors and remodelers: Lock specs with fewer change orders and smoother site coordination.
- Investors and flippers: Stress-test a finish package across multiple kitchens quickly for consistency and market fit.
- Agents and marketing teams: For pre-listing refreshes, test light paint, updated hardware tones, or a calmer backsplash to photograph better.
Visualize Your Next Listing (or Project) Before You Commit
A kitchen tells its story through surfaces. When you can audition ceiling tones, cabinet colors, backsplash patterns, and floor warmth on a single photo, you trade hunches for clarity—and you keep the spotlight on the best parts of the room.
Try your own image with ReimagineHome.ai’s surface restyling, or start from the homepage at ReimagineHome.ai. Decide faster. Build with confidence.