
TL;DR
Furniture Facelift in ReimagineHome.ai lets you recolor or restyle furniture finishes from a photo so mixed wood tones feel cohesive fast. It’s a practical way to preview walnut vs. oak vs. mid-century stains, decide on a rug or wall color, and avoid costly refinish experiments. Try a quick pass in ReimagineHome.ai’s Furniture Facelift while you read; it’s perfect for ai interior design decisions and real listing photos.
The Real Cost of Showing Rooms “As They Are” Online
Digital furniture restyling helps test wood finishes quickly and realistically from a single photo.
Digital furniture restyling is a simple way to test wood tones and finishes from a single photo. It matters because clashing undertones (cool vs. warm) and heavy contrasts can distract buyers online, stall a room makeover, and make great pieces feel like mistakes.
- Results: Make walnut, oak, and maple read as a coordinated palette instead of a clash.
- Realism: Preserve grain and sheen so edits look like real wood, not paint.
- Speed: Try multiple stains and materials in minutes, not weekends.
- Cost: Avoid refinishing, returns, or “buy then regret” cycles.
- Workflow: Use your actual room photo — no reshoot needed.
- ROI: Cleaner photos typically drive more clicks, saves, and buyer confidence.
- Peace of mind: Decide on rugs, wall colors, and accents with visual proof.
If you already have a tricky image in mind, upload it to ReimagineHome.ai and test this on a real room while you read.
Why This Visual Problem Hurts More Than You Think
Even one mismatched wood tone can disrupt your room’s harmony and make the space feel unfinished.
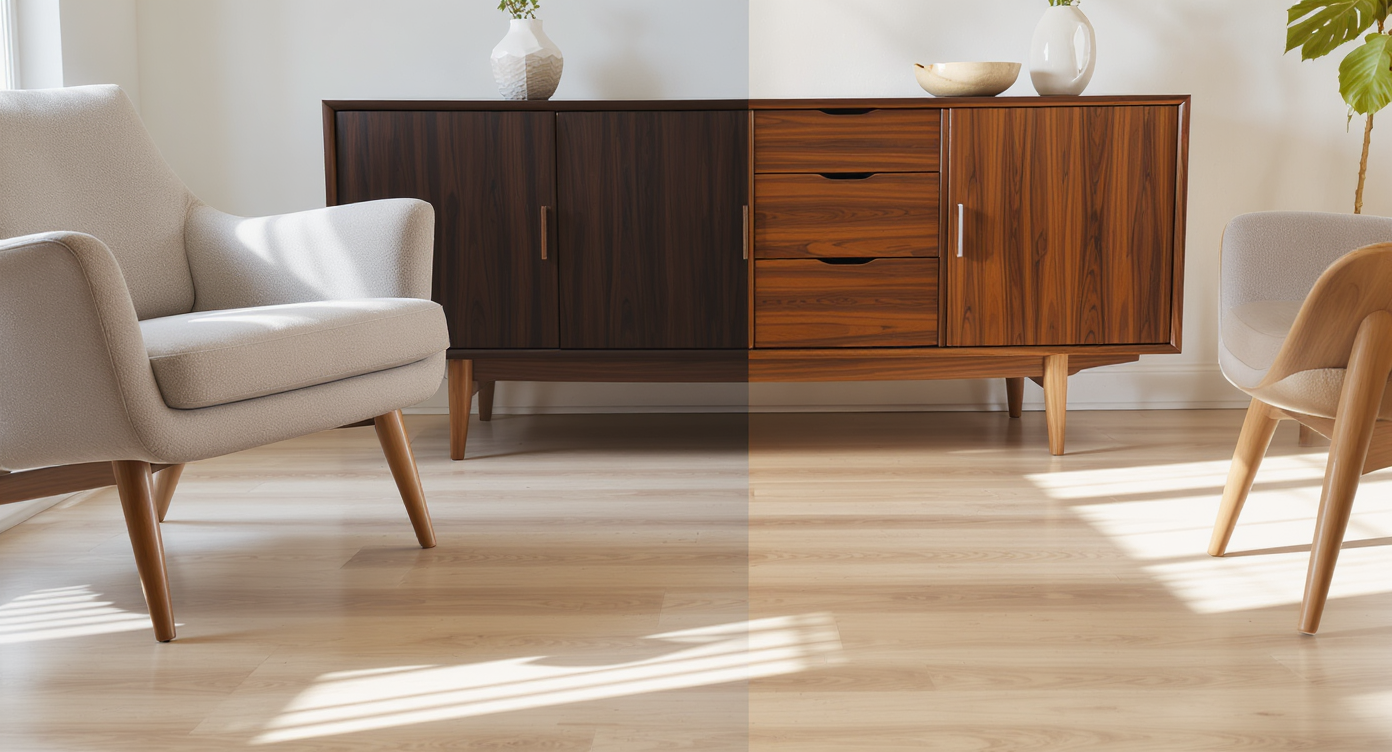
Even one “almost-right” wood tone can pull focus and make the rest of the room feel unfinished. Online, mixed wood tones without a clear palette can suppress clicks and saves because viewers pause on the problem instead of the features. In person, you start chasing fixes — sanding, staining, swapping — when all you needed was a tonal bridge like a rug, a darker frame, or a subtle finish tweak on the piece.
Here’s what’s actually happening: your eye reads undertones first (cool vs. warm), then contrast, then repetition. If you have a cool walnut against a cool light floor, it usually works; if you’re mixing a warm honey oak with a cool gray floor, it can feel jarring. The trick is either shifting the furniture’s finish slightly or repeating each wood tone elsewhere so nothing looks like the odd one out.
That’s where a quick AI furniture finish test steadies the decision. You can preview a richer walnut, a slightly desaturated mid-century tone, or even a matte black accent to see what calms the “clash” and creates an intentional story.
Anecdote
That “perfect but new-to-you” walnut console hitting a cool, pale floor and suddenly feeling loud — until you test a slightly smokier walnut, add a green-leaning rug, and the whole corner settles into mid-century ease.
What Furniture Facelift Actually Is (In Plain Language)
Furniture Facelift uses AI to restyle finishes realistically, retaining wood grain and natural sheen.
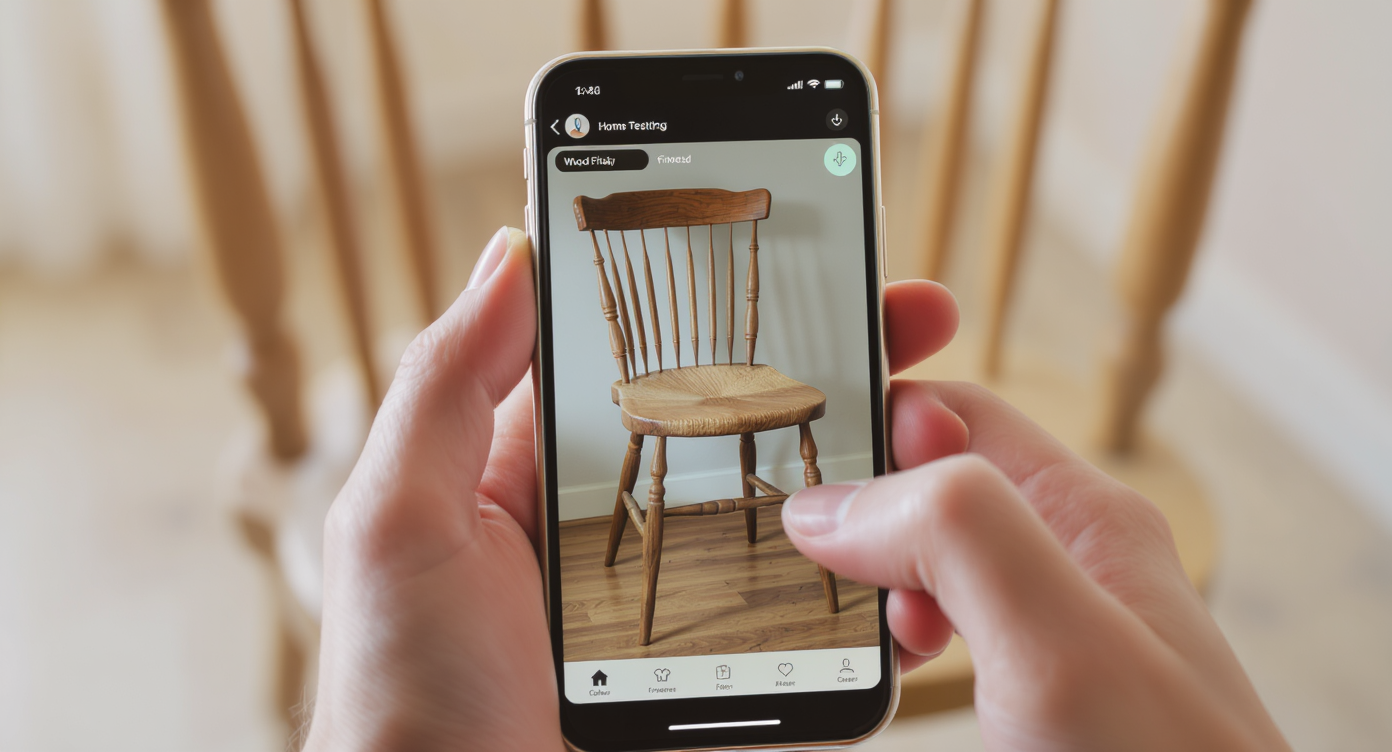
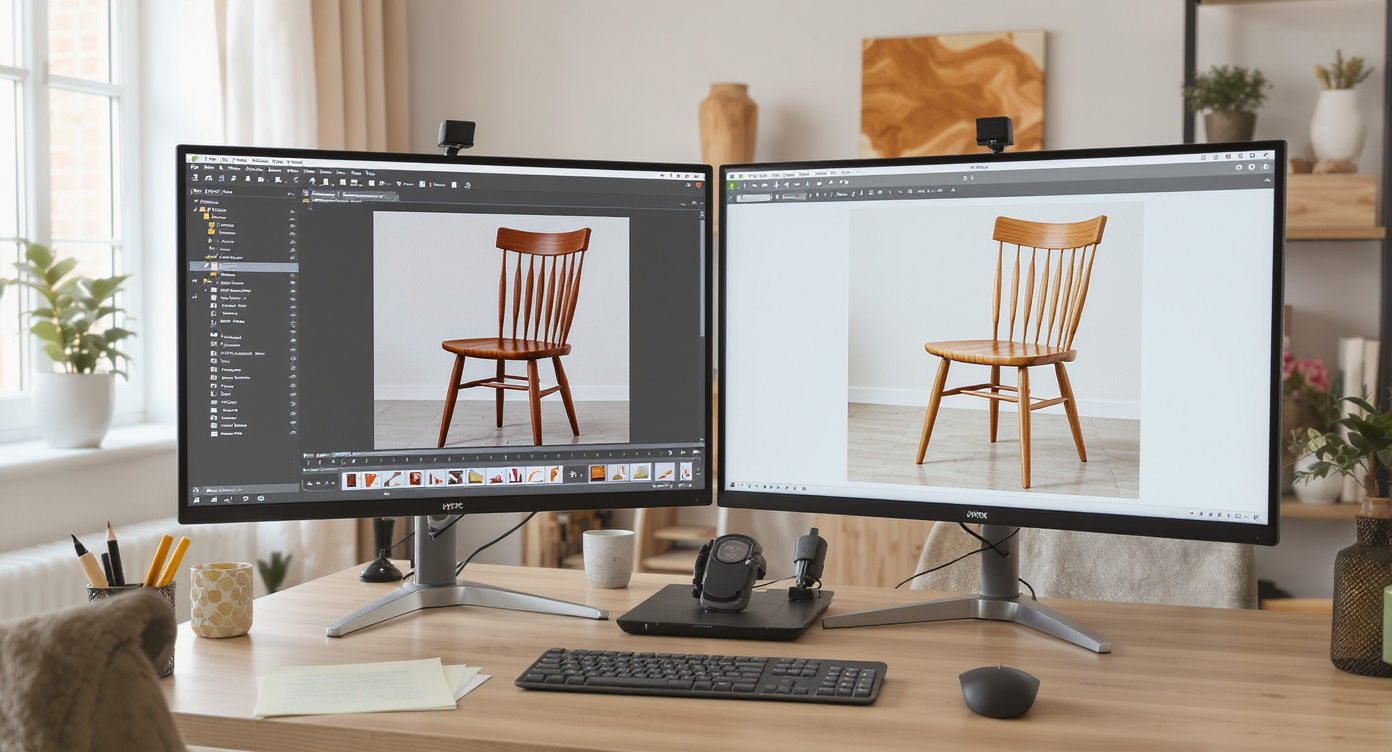
Furniture Facelift is an AI photo tool that restyles furniture finishes — wood stains, colors, materials, and sheen — while keeping the item’s form and grain believable. You upload a room photo, select the piece, choose a finish direction, and generate new looks in seconds. Outputs are high-resolution, MLS-friendly images you can export for listings, mood boards, or purchase decisions.
To try it on a walnut piece that feels too heavy against a pale floor, open ReimagineHome.ai’s Furniture Facelift. It’s purpose-built for surface restyling: think subtle tone shifts, mid-century stain tests, or a more neutral brown that plays nicer with gray floors.
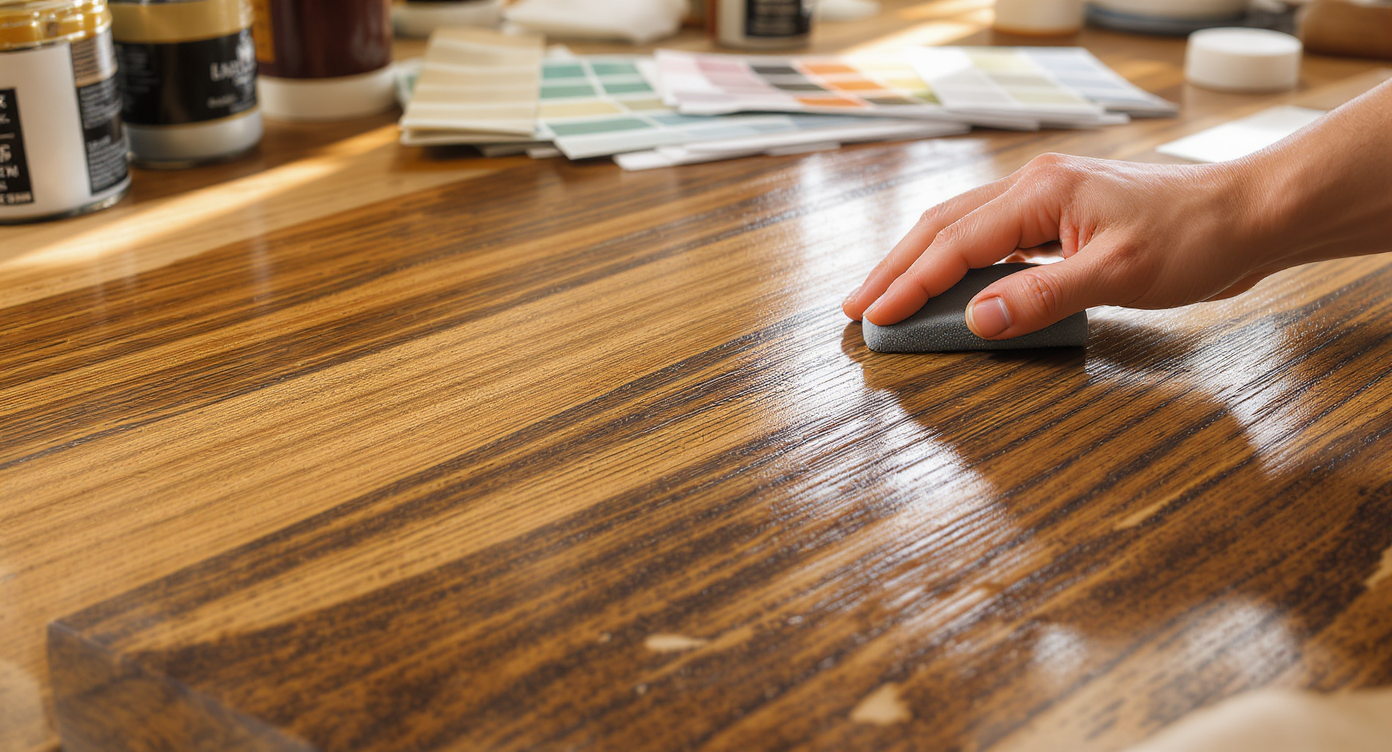
How Furniture Facelift Works Step by Step
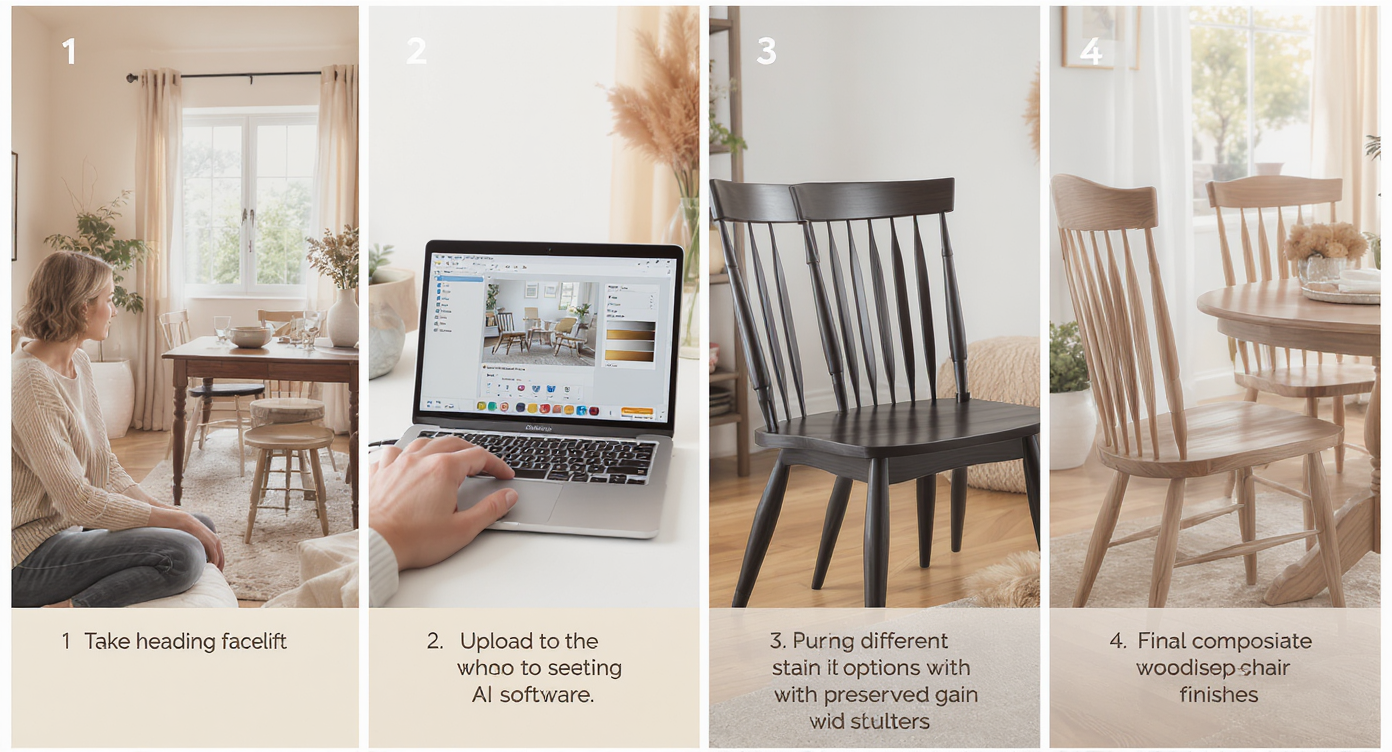
How Furniture Facelift works: from capturing your space to flawless wood tone coordination in minutes.
Start with a clear, well-lit photo — ideally 12MP+ and at least ~3000 px on the long edge — so the wood grain and edges are crisp.
- Choose the right photo: Shoot straight-on with soft daylight; avoid harsh glare that can flatten grain.
- Upload to ReimagineHome.ai: Use the Furniture Facelift tool to target just the piece you want to change.
- Mask the item: Trace the console, credenza, or table; include legs and edge bands for consistent results.
- Select a finish direction: Try “richer walnut,” “mid-century neutral,” “smoked brown,” or “desaturated oak.” You can also test matte vs. satin sheen.
- Generate and compare: Produce a few variations to see which one bridges your floor’s undertone best.
- Refine: Nudge lighter/darker by 5–10% and ensure the grain remains visible — realism beats perfection.
- Export: Save full-res for MLS, marketing, or to guide refinishing and shopping.
Constraint worth noting: keep changes plausible for the material (don’t turn tight-grain walnut into open-pore oak). Believability sells the vision.
Tips and Tricks for More Realistic Results
Tips for realistic finishes: preserve wood grain and subtly layer tones for an authentic look.
Realistic finish edits keep the wood’s grain and undertone intact while gently shifting tone and contrast.
- Match undertone, not exact color: Cool walnut + cool floor reads cohesive; if one is warm, either cool the furniture slightly or repeat a warm accent elsewhere.
- Use a bridge element: A rug with both floor and furniture browns (and a dark green or burnt orange accent) visually connects the two. This is often the fastest fix.
- Keep the grain: In Furniture Facelift, avoid presets that obliterate texture. Grain visibility is what keeps AI interior design edits believable.
- Repeat each wood twice: If you introduce walnut, echo it in a frame or lamp base; let the floor “find a friend” in a woven planter or light wood tray.
- Mind sheen: A satin finish can feel richer and less contrasty than high-gloss on camera.
- Align style era: Mid-century profiles look best with mid-century stain depth; don’t over-darken to faux “espresso” if the piece’s lines are light.
- Complement with paint: If undertones still fight, test a wall shift with ReimagineHome.ai’s digital Repaint Wall — a warmer white or muted green can harmonize the woods without touching the furniture.
- Polish the photo: A quick pass through image enhancement can balance exposure and color so wood reads true to life.
Visualization Scenario
Upload your photo, apply a mid-century walnut preset, then nudge the tone 10% cooler. Add a rug with both light oak and deep brown. In two minutes, the console and floor stop competing and start harmonizing.
FAQ
How do I mix wood tones without clashing?
Match undertones first (cool with cool, warm with warm), then repeat each wood tone at least twice in the room. Use a rug or wall color as a bridge and test furniture finishes digitally with Furniture Facelift.
Can AI really change wood finishes in photos and keep the grain?
Yes. Furniture Facelift is designed to preserve texture and edge detail while shifting tone, sheen, and material so results look like real wood, not paint.
What resolution do I need for realistic results?
A sharp photo at ~3000 px on the long edge (or higher) works best. Good light and clean edges help the AI keep grain and joinery crisp.
Is it okay to use edited furniture photos in real estate listings?
Cosmetic changes to removable items are generally acceptable when they don’t misrepresent permanent property features. When in doubt, disclose that finishes were virtually restyled.
Do I need to refinish the actual piece after using Furniture Facelift?
No — many people use it to validate purchases (rugs, wall color, accent woods). If you do plan to refinish, your exported image becomes a clear brief for stain depth and sheen.
Visualize Your Next Listing (or Project) Before You Commit
Think of Furniture Facelift as a dress rehearsal for your room makeover — a low-risk way to audition stains, confirm undertones, and prove that your walnut and pale floor can sing together. Whether you’re a homeowner choosing a rug, a stager planning a mid-century story, or an agent tidying listing photos, you get clarity before you spend on refinishing or returns.
Ready to calm the clash and set a palette? Try a quick pass in Furniture Facelift, or upload your photo to ReimagineHome.ai and explore a few variations in minutes.